Today we will discuss about Language Properties hook.Language property hook are used to overriding the existed portal language properties like Language_en.properties file for overriding of english language file.We can also add new properties by using Language Property hook.
Today we change :-1) Button text Sign In to Login .2)Error message This Field is required to Please enter this field.
So Lets start this step by step:-
Step 1:-Create Liferay hook projectFile-->New-->Liferay Plugin Project-->Provide name-->Select hook in plugin type-->Finish.You can see snapshot in my previous article (Step 1) Portal Properties Hook in Liferay.
Step 2:-Create hook inside projectRight click on project-->New-->Liferay hook Configuration-->tick Language.properties-->Next
then click on Add and provide name of property file which you want to override in my case i provide Language_en.properties
then click Ok and Finish.
Step 3:-Override PropertiesOpen Language_en.properties file which is inside content folder.Now if you attached source code in your eclipse press (ctrl+shift+r) and search for Language_en.properties
and open it .Now copy all the content of Language_en.properties of liferay file to our Language_en.properties file.
Now search for Key:-1)this-field-is-required and change the value to Please enter this field.Ex- this-field-is-required=Please enter this field.2)sign-in and change to Login.Ex- sign-in=Login
Step 4:-Entry in liferay-hook.xmlThis entry is automatically created by eclipse as:-<hook> <language-properties> content/Language_en.properties </language-properties></hook>
Step 5:-Check outputDeploy your hook and put out of box language portlet on your page and select english ie American Flag
And thats it refresh your page to see the output as:-
Here you can see Sign In change to Login and This field is required change to Please enter this field.
Project Structure
You can Download Source code from Language Property Hook in Liferay Hope this will Help....
Today we will discuss about Portal Properties hook.When we Create Account in liferay we have to provide the value of captcha today we disable the captcha field using Portal Properties hook.
We have portal.properties file inside portal-impl (\ROOT\WEB-INF\lib) which contain some properties.Here some properties have multiple values and some have only one value like true/false.All properties of portal.properties can not be override,we can override only those properties that is mentioned in dtd file you can download dtd file from liferay-hook_6_2_0.dtd.
So Lets start this step by step:-
Step 1:-DownLoad dtd fileFirst download liferay-hook_6_2_0.dtd file and check property related to captcha .Verify that any property is related to our requirement is available or not. Ex- we found propertycaptcha.check.portal.create_account
Step 2:-Create Liferay hook projectFile-->New-->Liferay Plugin Project-->Provide name-->Select hook in plugin type-->Finish
Step 3:-Create hook inside projectRight click on project-->New-->Liferay hook Configuration-->tick portal.properties-->Next
Then in specify properties to override click on Add button
Then Add Property override box is open click on select and select captcha.check.portal.create_account and provide value to false
Click ok and finish.
Step 4:-Check generated filesAll files are generated automatically you can see :-
a)portal.propertise(inside src)captcha.check.portal.create_account=false
b)liferay-hook.xml(inside web-inf)<hook> <portal-properties>portal.properties</portal-properties></hook>
Step 5:-Check output
Deploy the hook by right click on build.xml-->Run As-->Ant Build. Go to your browser click on sign in and than Create Account link:-
As you can see there is no Captcha here.
Project Structure
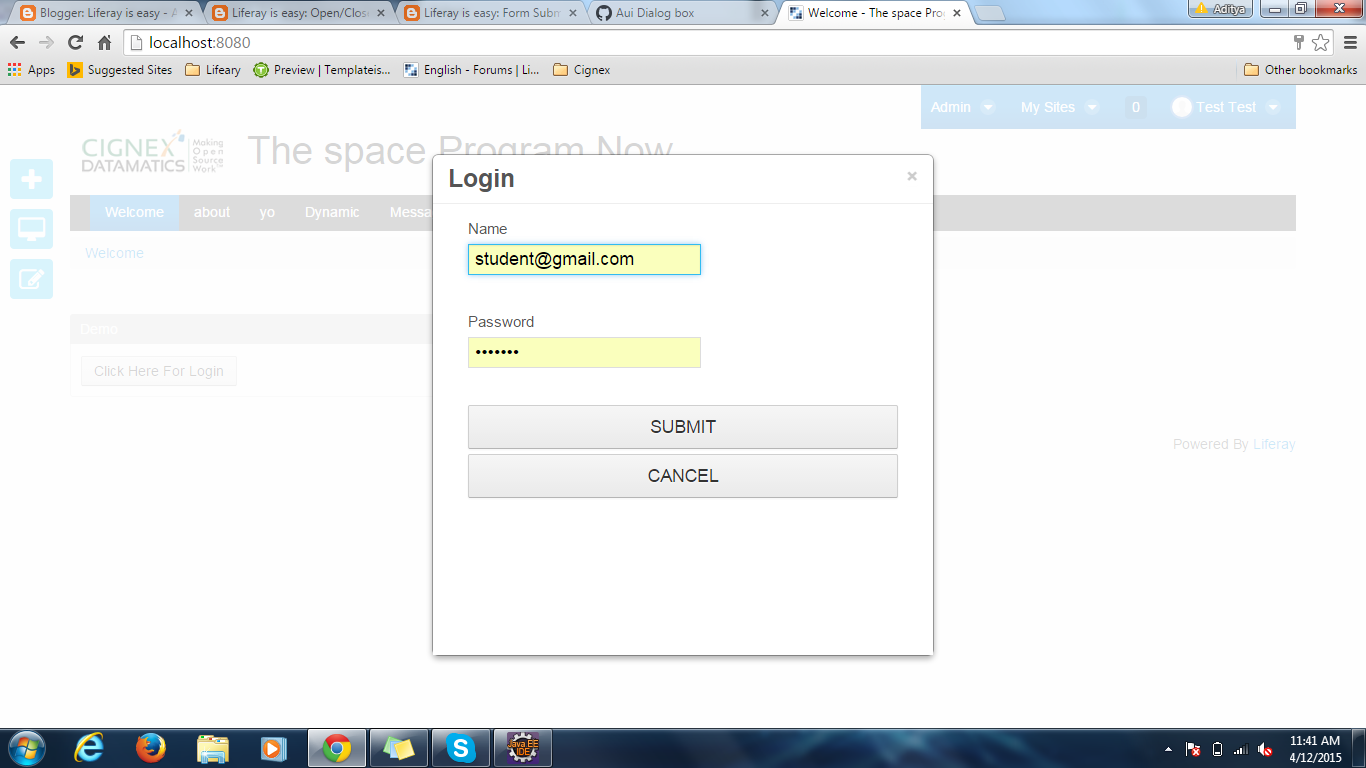
Today we will discuss how to Open and Close a Aui Dialog box in liferay.In this we create a button on click of button a form is opened in dialog box which contain two input fields name , password and two buttons one for Submit the form and second for cancel.On Submit form is Submitted and details are shown in the dialog box .On Cancel form is simply closed so lets start this step by step.
Step 1:-Create Liferay project and Change view.jspCreate a liferay project and then create a Generic portlet in it.Open view.jsp and paste the content:-
view.jspExplanation
Here we create a renderUrl with param value loginPage. On click of button with id="login" Liferay.Util.openWindow function is called which send the render Request to our controller with a parameter loginPage.
Step 2:-Handle Render Request inside ControllerJust fetch the path attribute and if it equals to loginPage then include login.jsp ie
String path = ParamUtil.getString(renderRequest, "path");if (path.equalsIgnoreCase("loginPage")) {include("/html/demo/login.jsp", renderRequest, renderResponse);}
Step 3:-Create login.jspInside login.jsp we just create a simple form with two text fields and two buttons one for cancel and one for submit and a actionUrl for submittion of form:-
login.jsp Step 4:-Handle Action Request inside ControllerWhen Submit button is clicked processAction method of our Controller is called
Demo.javaExplanation:-Here we fetch the attributes that comes in Action request and set in response so that we can use in detail page.Here we also set a third attribute :-
response.setRenderParameter("path", "details");This attribute help to determine the path in our doView() .
Step 5:-Send Controller to Details PageThe attribute set in as "path" inside processAction() is used in doView() because after processAction() doView() is called as:-
Demo.javaExplanation:-Here we fetch the attributes that are set as Render Parameter in processAction and again set in render Request so that they are available in details.jsp.
Step 6:-Create details.jspThe details.jsp is simple and self explanatory:details.jsp
Thats it this will open a dialog box and show details inside this.But what about CLOSE BUTTON.For Closing a Dialog box these steps are necessary:-
Step 7:-Modify login.jsp and view.jspPaste this code inside login.jsp .Here this method internally call method closeYourPopUp which is inside view.jsplogin.jspview.jsp
Thats it Complete code of view.jsp,login.jsp and Controller is:-
view.jsplogin.jspDemo.java
Output
Project Structure
That's it.
You can download source code from Aui Dialog Box in Liferay Hope this will help......
Related Post:-
Spring MVC portlet in LiferayForm Handling in Spring PortletMany To Many Relationship mapping in Liferay ServicesPortlet Name space Parameter in liferayForm Submittion using Ajax(AUI) in LiferayLiferay Service Builder in DetailHow to install MavenCreating Portlet/Services using Maven
Form Submission Using AJAX(AUI)
Today we will discuss how to Submit a form using Ajax .For sending Ajax request we are using Alloy UI (aui) tags.Then finally Print the form data to Success page.The important thing is when we use Ajax the response is come back in Json(or Xml) form then how we redirect to Success page?For achieving this we send another request from Ajax success part by using Java Script.So Lets start step by step:-Step 1:-Create Liferay project and Change view.jspCreate a liferay project and then create a Generic portlet in it.Open view.jsp and paste the content
view.jsp
Explanation:-1) In line (32-36) we create a simple form in which on click of submit button submitForm() is called.2)Inside submitForm() we send a Ajax call in which we are using id of form for sending data (Name,Password)of form to Controller.3)On success we parse the Json Data send by controller and then send another render Request by using java script (window.location.href) and appending the data in URL so that we can display on Success page.
Step 2:-Create Your controllerInside your controller paste this content:-
Demo.java
Explanation:-
1)Ajax Call comes to serveResource() here we fetch the form data and put in Json object and send back the response.2)On Success part of Ajax (line 23 of view.jsp) we send another render Request by using window.location.href and append parameters.This call comes to doView().3)Inside doView() we check the parameter(path) that is passed in render Request:-
<portlet:renderURL var="succcessURL"><portlet:param name="path" value="success"/></portlet:renderURL>
if path is success the we get the parameters and set in attributes so that they are available in success.jsp.After that we include success.jsp.(line 28-33) .
Step 3:-Create success.jspJust paste this content to success.jsp:-success.jsp Step 4:-Change Required name spaceWe are using simple form so we have to change required namespace parameter to false inside liferay-portlet.xml.For detail explanation on this you may refer my previous blog Portlet Name Space in liferay.
<requires-namespaced-parameters> false</requires-namespaced-parameters>
That's it.
You can download source code from Form Submittion By Ajax Hope this will help....
Related Post:-
Spring MVC portlet in LiferayForm Handling in Spring PortletMany To Many Relationship mapping in Liferay ServicesPortlet Name space Parameter in liferayOpen/Close AUI Dialog Box in Liferay Liferay Service Builder in DetailHow to install MavenCreating Portlet/Services using Maven
Show/Hide Content on basis of Role in Liferay
Today we will discuss how to Show/Hide content on the basis of role or we can say that how we perform Role checking in liferay. For achieving this we create two roles teacher and student then we create two users Student and Teacher and assign role accordingly.Then finally Check roles and show/hide content. Lets start step by step:-Step 1:-Create Two RolesGo to control panel-->Users-->Roles-->Add-->Regular RolesThen provide Name ,title and description as:-
and press save .Similarly create Student Role.
Step 2:-Create Two UsersThen create two users and assign roles to it. Go to control panel-->Users and Organizations-->All users-->Add User-->And provide details as:-
then click save.After that provide a password and click save .Similarly create another user with name Student.
Step 3:-Assign Role to UsersGo to control panel-->Roles-->On Teacher Click action-->Assign Users-->Available-->Selected Users Teacher-->Update Association.Similarly assign Student role to student user.
Step 4:-Check Role in jspview.jspExplanation:-
List<Role> userRoles = themeDisplay.getUser().getRoles();this will return List because one User can have many Roles so we iterare the List and and Checking Role name and on the basis of Role print statement accordingly.
Step 5(Optional):-Check Role in ControllerIf you want to check role in your controller then:-
Controller.java
Step 6:-Check OutputLogout from Admin(test@liferay.com) and then
1)Login via teacher@gmail.com and add your portlet on page you can see output as:-
2)Login via student@gmail.com and add your portlet on page you can see output as:-
As you can see output is Changed on the basis of Users.
You can download source code from Role Checking in Liferay Hope this will help....
Related Post:-
Spring MVC portlet in LiferayForm Handling in Spring PortletMany To Many Relationship mapping in Liferay ServicesLiferay Service Builder in DetailHow to install MavenCreating Portlet/Services using Maven