How To Use Ajax in Spring Portlet
Today we will discuss how to use Ajax in Spring Portlet. For this we create two select box one for country and second for States. When someone select country Ajax call is generated and dynamically add options in States select box depending on which country is selected.Before reading this blog it is highly recommended to read my previous blog Spring Portlet in Liferay and Form Handling in Spring Portlet .
Lets Start this step by step:-
Step 1:-Create Spring MVC Portlet
For creating a basic Spring MVC portlet you can refer my previous blog Spring MVC Portlet in liferay.
Step 2:-Attach jquery in Portlet
For using jquery open liferay-portlet.xml and in header javascript attach jquery.min.js
Ex-
<header-portlet-javascript>
http://ajax.googleapis.com/ajax/libs/jquery/1.11.2/jquery.min.js
</header-portlet-javascript>
Also put requires-namespaced-parameters is false inside liferay-portlet.xml.
Ex-
<requires-namespaced-parameters>
false
</requires-namespaced-parameters>
Step 3:-Create Ajax in your view.jsp
Open view.jsp and paste this content:-
view.jsp
Explanation:-
1)In line 4 we create a resource Url findState ,this URL is used to create a method in our controller that is using this value as:-
@ResourceMapping(value="findState")
2)In Line 6 to 27 we create our Ajax call that can use URL findState and send the name of country in a parameter countryName. If data return successfully in the form of json we parse the json data and by using for loop append the data in state select box.
Step 3:-Handle the Ajax Call
Open your controller and create a method that is call when Ajax is generated.:-
AjaxController.java
Explanation:-
1)Here we create a method findStateForCountry that is annotated with @ResourceMapping(value="findState") this find state must match with the id of resourceUrl that is created in view.jsp.2)In method findStateForCountry we create a Json Array and two Json objects and put value in the json object on the basis of India or USA and return the response.In json object we add two property one is id of state and second is name of state.This array is iterated in view.jsp to create state drop down.
Output:-


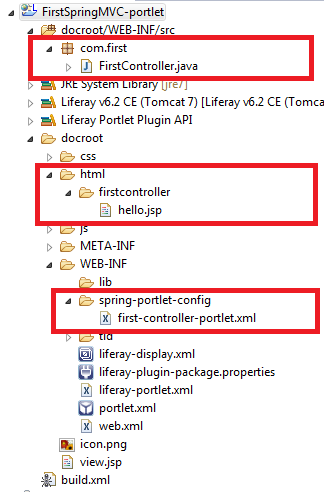
Project Structure:-

You can download source code from Ajax in Spring Portlet
Hope this will help....
Related Post:-
Spring MVC portlet in Liferay
Form Handling in Spring Portlet
Many To Many Relationship mapping in Liferay Services
Liferay Service Builder in Detail
How to install Maven
Creating Portlet/Services using Maven