Showing posts with label Hook. Show all posts

Custom Field/Attribute or Expando in Liferay Programmatically


We already know how to create custom field using control panel . 
Lets consider a scenario we create 40 custom fields in our local server using control panel . When i deployed my application to production server we need to create all custom fields again in production server . What if as soon as our application start and all custom fields create automatically????


Today we will create same custom field married in User entity which contain boolean value Programmatically . For this we use Event hook in Liferay. So before reading this blog it is highly recommended to read my previous blogs on Custom Fields  and  Event hook in liferay.

So lets start step by step:-

Step 1:-Create Liferay project
File-->New-->Liferay Plugin Project-->Provide name-->Select hook in plugin type-->Finish.


Step 2:-Create  hook inside project
Right click on project-->New-->Liferay hook Configuration-->tick portal.properties-->Next.


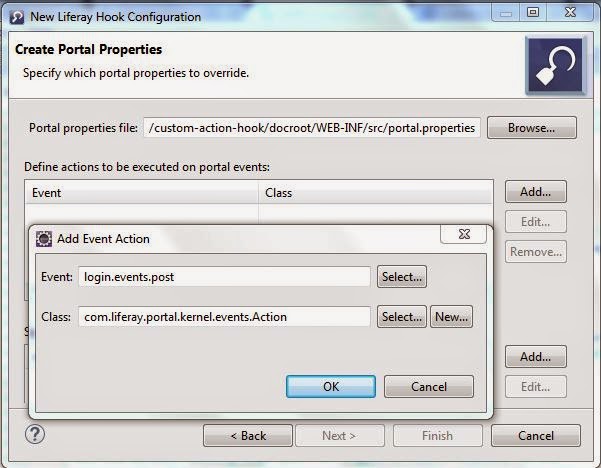
then a pop up is open.Add a new event application.startup.events and add a Class which is called on application start.


Step 3:-Check Generated Code
By using eclipse ide portal.properties file automatically created as:-

portal.properties
and liferay-hook.xml as:-

liferay-hook.xml

Step 4:-Provide Code for Custom field Creation
Open CustomFieldsCreations.java from package com.test and paste this code:-

CustomFieldsCreations.java


Explanation:-

  • run method is called when ever application starts.
  • addExpandoTable method check if table already exists than do nothing otherwise create a new table with name  CUSTOM_FIELDS.
  • addExpandoColumn method check if table CUSTOM_FIELDS contain a column with name married if yes do nothing otherwise create new column .
  • addCoumn method of ExpandoColumnLocalServiceUtil take 4 parameters tableId, Column name, type of field here we use boolean and default value which i take as unmarried ie false.

Step 5:-Check Output
Open database and check tables expandotable and expandocolumn.
Or you can go to control panel and check a new custom field is added in User entity.

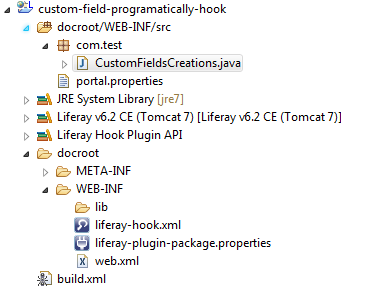
Project Structure

Fetch/Retrive a Document with its Metadata Programmatically in Liferay


In my previous blogs we see how to upload a file with metadata. Now its time to fetch all the data Programmatically .Before reading this blog you must know how to create metadata sets and document type for this you can read my previous blog Save Document with Metadata in Liferay. 

This can be done in 2 parts:-
  • First we have to create indexer Post Processor hook.
  • Secondly we create Portlet for fetching the data.
For this blog i am using liferay 6.1.

Before start just create Resume(metadata sets) and Resume Type(Document Types) as describe in my previous blog Save Document with Metadata in Liferay. 

So lets start this step by step:-


Step 1:-Create Indexer Hook
For creating indexer post processor hook you may refer my previous blog Indexer Post Processor Hook in Liferay . Here i just created indexer on DLFileEntry Class and apply indexing on experience.

liferay-hook.xml


ExperienceIndexer.java


Explanation:-


  • In the postProcessDocument method we just fetch the metadata experience and add this as a index with key YearOfExperience.This method is called each time when we add a Resume ie Document Type Resume Type.
  • In postProcessSearchQuery method we create a Boolean query and pass experience as a argument.This method is called by our portlet.


Step 2:-Create Portlet that Call Boolean Query
Just create a Liferay Project with MVC portlet in it.Inside the Jsp file paste this content:-

view.jsp
And in your controller paste this content:-

Demo.java

Explanation:-
Here when we create SearchContext Object and set the attribute experience in it.This will automatically call the postProcessSearchQuery method of indexer and get the result on the basis of Experience. 

Step 3:-Check the output
Just create a folder and set the document type as "Resume type" as explained in my previous blog and add some document and provide experience as 4.5 or 3.0 etc.Now deploy your portlet and see the output as:-


When  you hit submit see the console :-


Hope this will Help....

You can Download Source code from  Fetch a Document with Metadata Programmatically in Liferay.


Related Post:-

Use of Custom Field/Attribute or Expando in Jsp (Hook)


Today we will discuss how to use Custom Attribute in Jsp.Before reading this, you must read my previous blog on Custom Field in Liferay and Jsp Hook in Liferay.

Here we create a Jsp hook for create account page , so when user fill the form for create account he also provide maritial status and on click of submit button maritial status is also save with the User .

So Lets start this step by step:- 

Step 1:-Create Custom Field using Control Panel
Create Custom field by control panel.For creating this you may follow Custom Field in Liferay.


Step 2:-Change Permission
Go to Control panel-->Configuration-->Custom field-->
User-->married-->action-->permission.

Change permission of guest to view and update also as:-


Step 3:-Create Jsp hook
Now create jsp hook that override create_account.jsp .You can see step by step how to create jsp hook in my blog Jsp Hook in Liferay.
Now enter this line in create_account jsp as:-


Explanation:-
Here we are using <liferay-ui:custom-attribute> tag by using this tag we don't need any code for persisting the custom attribute, it automatically saved with User . Otherwise we have to fetch this add by using expando service .

Step 4:-Deploy the hook
Now deploy the hook and see the result as:-


when you click submit the user is save in user_ and custom attribute is save in expandorow and expandovalue.


Note:-
If you  want that label Married is replace by some other value you can use language hook as in my blog Language Property hook in liferay.

You can Download Source code from Use of Custom Attribute in Create Account

Hope this will Help.....


Index Post Processor Hook in Liferay


Today we will discuss about Index Post Processor Hook  in Liferay. In Liferay if you want to providing indexing on some column for searching ,sorting etc. than you can use Index Post Processor Hook.

Ex-Sign in-->Admin -->Control panel-->Users and organization--> all users. Than try to search user by First Name, Last Name,Screen Name you can search easily but than try to search user by Job Title than no result is found.So today we apply indexing on Job Title by using Index Post Processor Hook.


So lets start step by step:-

Step 1:-Create Liferay hook project
File-->New-->Liferay Plugin Project-->Provide name-->Select hook in plugin type-->Finish.
You can see snapshot in step 2 of Portal Properties Hook in Liferay


Step 2:-Create  Class that provide indexing
Now create a package com.demo inside src and then create your class that extends BaseIndexerPostProcessor and override postProcessDocument method.

CustomIndexer.java 


Explanation:-
document.addText(Field.TITLE,jobTitle);

Liferay already apply query on the basis of jobTitle.By using addText we send our jobTitle for indexing, so liferay use this in query.For more detail you may refer UserIndexer.java in source code.As a result for example a user has name "Developer" and other user with Job Title "Developer" than in output both result come.

Step 3:-Provide entry in liferay-hook.xml
Now open liferay-hook.xml click on overview and select indexer class Name as User and IndexerPostProcessor as your class.


This will provide entry in liferay-hook.xml as:-

liferay-hook.xml


Step 4:-Check output
Now deploy the hook and create new user and give some job title. Now try to search this user by Job title.You can easily search this user.

Note:- Only those user can be searched by Job title that are created after deployment of Hook . Previous users are not search by Job title as there is no indexing on job title.

Project Structure


You can Download Source code from Index Post Processor Hook in Liferay


Hope this will Help.....

Custom Action(Events) Hook in Liferay


Today we will discuss about Custom Action Hook  in Liferay. In liferay there are some portal events you can see those events in portal.properties.These events are:-

  • application.startup.events
  • application.shutdown.events
  • login.events.pre
  • login.events.post
  • logout.events.pre
  • logout.events.post
  • servlet.service.events.pre
  • servlet.service.events.post
  • servlet.session.create.events
  • servlet.session.destroy.events

The action of these events are defined in portal.properties so we need to extend portal.properties to create a custom action.


So lets start step by step:-


Step 1:-Create Liferay hook project
File-->New-->Liferay Plugin Project-->Provide name-->Select hook in plugin type-->Finish.
You can see snapshot in step 2 of Portal Properties Hook in Liferay

Step 2:-Create  hook inside project
Right click on project-->New-->Liferay hook Configuration-->tick portal.properties-->Next.


then this pop up is open:-


then click on add another pop up is open where you can select the event click on select event button.This time pop up open with events as:-


Select login.events.pre and click ok.Now Click on New button of previous figure to add our class as:-


Provide Classname, java package and select  superclass  as Action and click ok.


Now Ok and finish.This will create portal.properties file automatically also provide entry in liferay-hook.xml.

Step 3:-Check Generated Code
By using eclipse ide portal.properties file automatically created as:-

portal.properties

and liferay-hook.xml as:-

liferay-hook.xml

Step 4:-Provide your custom code
Open MyCustomLoginAction.java from package com.test and paste this code:-

MyCustomLoginAction.java

Step 5:-Check Output
Now deploy your hook and login to liferay as soon as you login the eclipse console shows:-

My Login Pre event


Project Structure


You can Download Source code from Custom Action Hook in Liferay


Hope this will Help.....

Adding Struts Action by Hook in Liferay


Today we will discuss about Adding Struts action in Liferay by using Hook.Before reading this blog you must read my previous blog on  Override Struts Action by Hook in Liferay. Adding Struts action is similar to overriding Struts Action but the difference is :-

For Overriding we extends BaseStrutsPortletAction Class.
For Adding we extends BaseStrutsAction Class.

So lets start step by step:-

Step 1:-Create Liferay hook project
File-->New-->Liferay Plugin Project-->Provide name-->Select hook in plugin type-->Finish.
You can see snapshot in my previous article (Step 1)   Portal Properties Hook in Liferay.


Step 2:-Create Action Class
Create a package com.aditya.demo inside src and than create a class as:-

AddingStrutsAction.java

Explanation:-
In this class we extend BaseStrutsAction class and just provide path of jsp.

Step 3:-Create entry in liferay-hook.xml
Provide the entry of your action class in liferay-hook.xml:-

 liferay-hook.xml

Explanation:-
In this xml we provide the path ie URL and implementing class. For hitting this URL we have to append c as:
http://localhost:8080/c/portal/liferayiseasy 

Step 4:-Create required jsp
Create a jsp hook for the jsp as we return our path from action class as "/portal/message.jsp".

So create a structure in docroot as:-
docroot\custom_jsps\html\portal\message.jsp

Our message.jsp contain just one line:-

message.jsp

and provide entry in liferay-hook.xml as:-
 <custom-jsp-dir>/custom_jsps</custom-jsp-dir>

when you deploy your hook this jsp is available in
"\tomcat-7.0.42\webapps\ROOT\html\portal".

That's it when you hit "http://localhost:8080/c/portal/liferayiseasy" liferay show login page provide credential and you can see 
message .jsp.When you hit the URL and you don't want to provide the credential just make the URL public by property hook.

Step 5:-Make URL to public
Just create Portal Property Hook and override auth.public.paths as:-
auth.public.paths=/portal/liferayiseasy

Now finally your liferay-hook.xml become :-

liferay-hook.xml

For detail of how to create Portal Properties hook you may follow my previous blog Portal Property Hook in Liferay


That's it hit "http://localhost:8080/c/portal/liferayiseasy" and you see output as:-
Welcome here Aditya Bhardwaj

Project Structure


You can Download Source code from Adding Struts Action Hook in Liferay


Hope this will Help....

Override Struts Action by Hook in Liferay


Today we will discuss about Struts Action hook.By using Struts Action hook we can achieve two things:-
1)Overriding existing struts Action
2)Add new Struts Action

Today we will discuss about Overriding existing struts Action. Every time you login a Struts Action is called.Struts use a file called struts-config.xml you can find this file inside WEB-INF .

For overriding Struts Action your custom class must extend BaseStrutsPortletAction which implements  StrutsPortletAction which  contain processAction().
So Lets start step by step:-


Step 1:-Create Liferay hook project
File-->New-->Liferay Plugin Project-->Provide name-->Select hook in plugin type-->Finish.
You can see snapshot in my previous article (Step 1)   Portal Properties Hook in Liferay.

Step 2:-Create Action Path
Open Struts-config.xml (\webapps\ROOT\WEB-INF) and search for login action you will find entries as:-

struts-config.xml

As you can see path "/login/login" goes to "LoginAction" Class. We change this class to our Custom class.So just provide those entries in liferay-hook.xml as:-


liferay-hook.xml

Step 3:-Create Action Class
Inside "docroot/WEB-INF/src" create package com.test and create a class with name MyCustomAction as:

MyCustomAction.java

Explanation:-
Here we create our processAction() and inside this method we call the original processAction() so that flow of liferay not break.In place of SOP you can write your own logic.Similarly for render().

Step 4:-Check Output
Deploy your hook and hit localhost:8080 and then press SignIn button on the top right.Your eclipse console shows:-

My Custom Render Method is Called

Then fill the values in login form and press Sign In


Your eclipse console shows:-

My Custom Process Action Method is Called

Project Structure


You can Download Source code from Override Struts Action Hook in Liferay


Hope this will Help....

Language Properties Hook in Liferay


Today we will discuss about Language Properties hook.Language property hook are used to overriding the existed portal language properties like Language_en.properties file for overriding of english language file.We can also add new properties by using Language Property hook.

Today we change :-
1) Button text Sign In  to Login .
2)Error message This Field is required to Please enter this field.


So Lets start this step by step:-

Step 1:-Create Liferay hook project
File-->New-->Liferay Plugin Project-->Provide name-->Select hook in plugin type-->Finish.
You can see snapshot in my previous article (Step 1)   Portal Properties Hook in Liferay.


Step 2:-Create  hook inside project
Right click on project-->New-->Liferay hook Configuration-->tick Language.properties-->Next


then click on Add and provide name of property file which you want to override in my case i provide Language_en.properties


then click Ok and Finish.

Step 3:-Override Properties
Open Language_en.properties file which is inside content folder.Now if you attached source code in your eclipse press (ctrl+shift+r) and search for Language_en.properties


and open it .Now copy all the content of Language_en.properties of liferay file to our Language_en.properties file.

Now search for Key:-
1)this-field-is-required and change the value to Please enter this field.Ex- this-field-is-required=Please enter this field.
2)sign-in and change to Login.Ex-  sign-in=Login


Step 4:-Entry in liferay-hook.xml
This entry is automatically created by eclipse as:-
<hook>
<language-properties>
content/Language_en.properties
</language-properties>
</hook>


Step 5:-Check output
Deploy your hook and put out of box language portlet on your page and select english ie American Flag


And thats it refresh your page to see the output as:-


Here you can see Sign In change to Login and This field is required change to Please enter this field.

Project Structure


You can Download Source code from Language Property Hook in Liferay


Hope this will Help....