Validation In Liferay

Validation in Liferay by using Validator Class Provided by Liferay


Validation in Liferay is very simple by using Validator Class. Validator Class give all the usefull method that can be used for validation. You can also use your logic for validation. In this tutorial i use both approach.

Here we create a simple form that contain a text field for phone number we validate that phone number must contain Numbers and not less than 10 digits if error occur again this form is shown with already filled previous value otherwise go to success page.


Step 1 :- Create liferay project in java file paste the content 

package com.test;
import java.io.IOException;
import javax.portlet.ActionRequest;
import javax.portlet.ActionResponse;
import javax.portlet.PortletException;
import javax.portlet.PortletRequestDispatcher;
import com.liferay.portal.kernel.portlet.LiferayPortletConfig;
import com.liferay.portal.kernel.servlet.SessionErrors;
import com.liferay.portal.kernel.servlet.SessionMessages;
import com.liferay.portal.kernel.util.ParamUtil;
import com.liferay.portal.kernel.util.Validator;
import com.liferay.portal.util.PortalUtil;
import com.liferay.util.bridges.mvc.MVCPortlet;

public class ValidationDemo extends MVCPortlet {
 public void inClass(ActionRequest request,ActionResponse  response) throws PortletException, IOException
 {
String phoneNumber = ParamUtil.getString(request, "phone");
SessionMessages.add(request, ((LiferayPortletConfig)getPortletConfig()).getPortletId() + SessionMessages. KEY_SUFFIX_HIDE_DEFAULT_ERROR_MESSAGE);
 
if(!Validator.isDigit(phoneNumber))
{
SessionErrors.add(request, "notNumber");
}
if(phoneNumber.length()!=10)
{
SessionErrors.add(request, "lessLength");
}
request.setAttribute("phoneNumber", phoneNumber);
 
if(SessionErrors.isEmpty(request))
{
response.setRenderParameter("jspPage","/html/validationdemo/success.jsp");
}
 }
}


Explanation:-

1)Using Validator Class:-we use Validator.isDigit(String) method to check that Phone number must be between 0-9 and not contain a-z orA-Z.

2)Using Custom Logic:-In (phoneNumber.length()!=10) we check that Phone number must contain 10 digits.

In both we add error key in SessionsError

3)If error occur we send back the Phone number to view.jsp so that it fill in the text box again 
          request.setAttribute("phoneNumber", phoneNumber);

4)If no error occur we send response to success.jsp


Step 2:- Paste Content to view.jsp

<%@ taglib uri="http://java.sun.com/portlet_2_0" prefix="portlet" %>
<%@ taglib uri="http://liferay.com/tld/ui" prefix="liferay-ui"%>
<portlet:defineObjects />
<portlet:actionURL name="inClass" var="injsp"></portlet:actionURL>

<liferay-ui:error key="notNumber" message="Phone Number not Contain Alphabets"/>
<liferay-ui:error key="lessLength" message="Phone Number Must be of 10 Digit"/>

<form action="${injsp}" method="post" >
Phone Number:<input type="text" name="phone" value="${phoneNumber}"><br>
<input type="submit" value="Submit">
</form>

Explanation:-

1) The Error keys map with Corresponding messages

<liferay-ui:error key="notNumber" message="Phone Number not Contain Alphabets"/>
<liferay-ui:error key="lessLength" message="Phone Number Must be of 10 Digit"/>

2)In input box we set the value of phone number send by request

<input type="text" name="phone" value="${phoneNumber}">

Step 3:- Paste Content to success.jsp

<h1>Success Fully Submitted</h1>

Step 4:-Deploy your Project and see output


Hope This Help


Related Post:-


Liferay Message Customization

Today we Customize liferay Error and Success Messages . Here If user provide hello as name and hello as password success message is shown otherwise error message is shown


Step 1:-Create Liferay Project 

In eclipse click  File-->New Liferay Plugin Project-->Give Project Name --> Finish

Step 2:-Create Liferay Portlet in the project 

Then Right Click on Project-->New  Liferay Portlet-->Give the portlet Class-->And select Generic Portlet-->next


Then check create resource bundle file check box


then give the Display Category and finish


Step 3:- Add the following code in view.jsp

<%@ taglib uri="http://java.sun.com/portlet_2_0" prefix="portlet" %>
<%@taglib uri="http://liferay.com/tld/ui" prefix="liferay-ui" %>
<portlet:defineObjects />
<portlet:actionURL var="actionUrl" ></portlet:actionURL>

<liferay-ui:success key="success-key" message="Successfully" />
<liferay-ui:error key="error-key" message="error"/>

<form action="<%=actionUrl %>" method="post">
Name:<input type="text" name="name" ><br>
Password:<input type="password" name="pass"><br>
<input type="submit" value="Submit">
</form>


Explanation of view.jsp

Here we use
<liferay-ui:success key="success-key" message="Successfully" />
<liferay-ui:error key="error-key" message="Error"/>

the success-key and error-key both are set in Java Class 
the message Successfully is shown if success-key is found(in green color) and
the message Error is shown if error-key is found(in red color)

Step 4:- Add the following code in your Class

 @Override
 public void processAction(ActionRequest request, ActionResponse response)                                throws   PortletException,  IOException {
String name = ParamUtil.getString(request, "name");
String password = ParamUtil.getString(request, "pass");
if(name.equalsIgnoreCase("hello")&& password.equalsIgnoreCase("hello"))
{
SessionMessages.add(request,"success-key");
}
else{
SessionErrors.add(request, "error-key");
}
}

Explanation of Class

1) SessionMessages.add(request,"success-key");

This "success-key " is added if user enter hello as name and hello as Password and this must match in view.jsp 

<liferay-ui:success key="success-key" message="Successfully" />

2) SessionErrors.add(request, "error-key");

This "error-key" is added if user not added hello as name and hello as password this key must match in view.jsp as

<liferay-ui:error key="error-key" message="Error"/>


Step 5:- Deploy Your Portlet on server

Right click on build.xml --> Run on Ant build

Step 6:- Open Browser and hit http://localhost:8080/ 

Add your portlet on page and put hello hello


If provide any other value


Step 6:- Disable Liferay Default error message(Your Request Failed to complete)

 Add these two lines in your Class

PortletConfig portletConfig =         (PortletConfig)request.getAttribute(JavaConstants.JAVAX_PORTLET_CONFIG);

SessionMessages.add(request, ((LiferayPortletConfig)portletConfig).getPortletId() + SessionMessages.KEY_SUFFIX_HIDE_DEFAULT_ERROR_MESSAGE);

and again deploy


As you see only our message is shown 

 If you want that your Message is not hard Coded and come from properties file


Step:-7 Provide entries of Language.properties in portlet.xml

Their is a Language.properties file is created in content folder (Due to Step 2) provide the entry of this in portlet.xml(actually this is already done by eclipse)

<resource-bundle>content.Language</resource-bundle>

Step:-8 Provide entries in Language.properties 

Put entries in Language.properties file

Successfully=This Success Message come from Language.properties file
Error=This Error Message come from Language.properties file

These "Succeessfully" and "Error" must match with message of view.jsp as

<liferay-ui:success key="success-key" message="Successfully" />
<liferay-ui:error key="error-key" message="Error"/>

Step:-9 Deploy Your Portlet


So first Liferay try to find the message in Language.properties if following key is not found then show the normal message described in view.jsp ie if you delete

Successfully=This Success Message come from Language.properties file

from properties file then error message come from Language.properties file but success message is from jsp file

Success message from jsp


Error message from Language.properties file                                                                                           


HOPE THIS WILL HELP


Jasper Report with Eclipse

Here we learn Step by Step to create jasper Report with eclipse, iReport with the help of java bean

Step 1: First Download  iReport-5.5.0-windows-installer and jasperreports-5.5.0 remember both version must be same like in this case both are 5.5.0

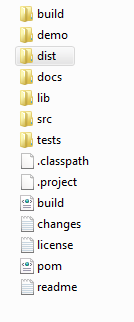
Step 2: Extract the jar file after extracting you find 


step 3: Open eclipse create java project then create folder with name library and copy all the files 
from lib and dist folder and add to the build path.

step 4: Create java bean with setter and getters if there is a field which is a object then create seperate class for the field . If a field is occur more than once then declare that field as a collection
like List.

                                            Address.java

package bean;

public class Address {
private String city;
private String country;
public String getCity() {
return city;
}
public void setCity(String city) {
this.city = city;
}
public String getCountry() {
return country;
}
public void setCountry(String country) {
this.country = country;
}

}

                                                 Employee.java

package bean;

import java.util.List;

public class Employee {
private int id;
private String name;
private List<Address> address;

public List<Address> getAddress() {
return address;
}
public void setAddress(List<Address> address) {
this.address = address;
}

public int getId() {
return id;
}
public void setId(int id) {
this.id = id;
}
public String getName() {
return name;
}
public void setName(String name) {
this.name = name;
}


}

step : 5 Create a factory class which contain a static method whose return type is Collection that return objects of your bean class.

                                                         EmployeeImpl.java


import java.util.ArrayList;

import java.util.Collection;

import java.util.HashMap;

import java.util.List;


import bean.Address;

import bean.Employee;


public class EmployeeImpl {


public static Collection<Employee> getEmployee()
{
List<Employee>employees = new ArrayList<Employee>();
Employee e= new Employee();
e.setId(1);
e.setName("Aditya");
List<Address> addresses =new ArrayList<Address>();
Address a =new Address();
a.setCity("Ashok Nagar");
a.setCountry("India");
Address a1 =new Address();
a1.setCity("Ashok Nagar");
a1.setCountry("USA");
addresses.add(a);
addresses.add(a1);
e.setAddress(addresses);
employees.add(e);
return employees;
}
}


step : 5 Export this project as .jar

step :6 Now open ireport click on tools-->options---> classpath-->Add jar  Attach your jar file tick and press ok.

step :7 Click on Report Datasources-->New-->java bean set Datasource-->Click next
then give complete name of your factory class and your static method


then click on test a dialog box is open with a successfully message click save.

Step: 8 Click file-->New-->Blank A4-->Open this tempelate-->Give Report Name to Employee


Click next--> Finish.

Step: 9 Click  (near Preview)


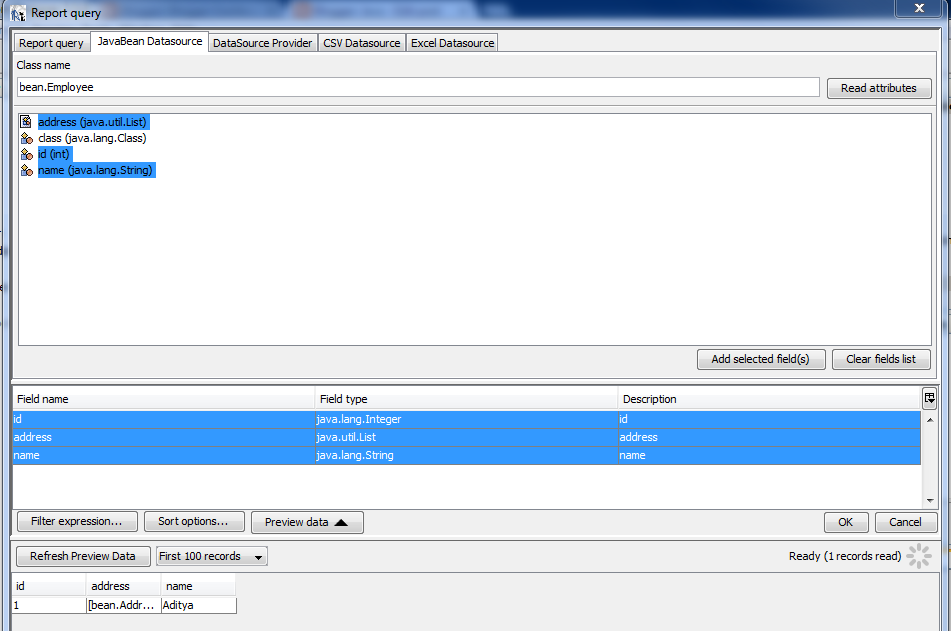
Click java bean data source give name of your bean class click read attribute then select all except class click add selected field click preview data here you see all your value 

Click ok

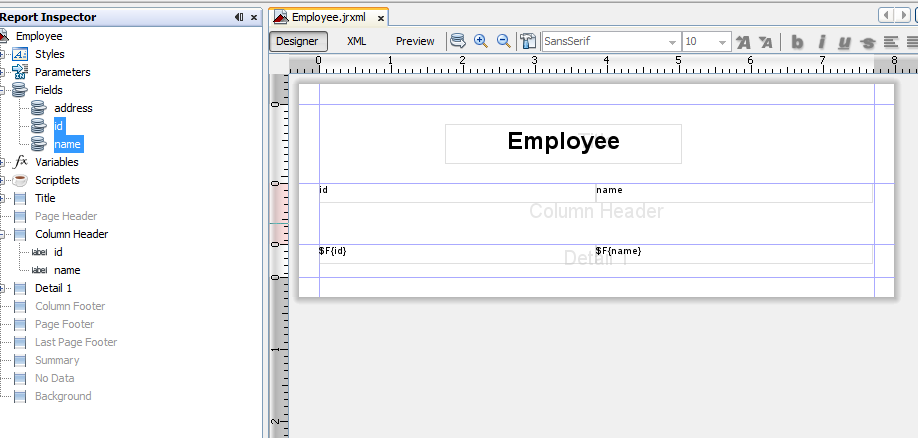
Step: 10 Then all the fields are come in field add id,name but not Address because it is a object for this we must create a subreport which is to be added in Employee.


Step 11: From Pallette add drag subreport in the details band a dialog box is open check create a new report-->next-->blank A4-->next---> 


Data source is same as Employee because it contain the factory method.
Click next-->next-->Give sub report a name ex Employee_Address click finish

Step:12 Click on your Employee report then click on sub report so that on the right side properties of subreport is open change connection type to use a data source expression


 Click on data source expression a dialog box is open that contain all the properties id,name,address use
 new net.sf.jasperreports.engine.data.JRBeanCollectionDataSource($F{address})


Click Ok.

Step :13 Then repeat step 9 but this time give name of Address Bean and not preview data because if you preview data it gives a error 


Step :14 Then attach your Country, City  to your subreport compile it but preview your Employee report if you preview your sub report it gives an error


Thats it you can see your report but if you want to call it from your java code then some additional steps need to be done.

Step 15: Change Language of both your report from groovy to java Click on Employee and Employee_Address in Report Inspector then on right hand side their is a language drop down change groovy to java


Step 16: Add both Employee.jrxml and Employee_Address.jrxml to your eclipse project inside jrxml project .And create a Class with main() 

public static void main(String[] args) {

HashMap<String, Object> hm = new HashMap<String, Object>();
JRDataSource  ds = new JRBeanCollectionDataSource(EmployeeImpl.getEmployee());
        JasperReport jasperReport;
        JasperPrint jasperPrint;
        try {
            jasperReport = JasperCompileManager.compileReport("jrxml/Employee.jrxml");
            jasperPrint = JasperFillManager.fillReport(jasperReport, hm, ds);
            JasperExportManager.exportReportToPdfFile(jasperPrint, "simple_report.pdf");
        } catch (JRException e) {
            e.printStackTrace();
        }

}

Run the class refresh your project and yipeeeee their is a pdf with name simple_report.pdf

Project Structure


Hope this help...