Custom Field/Attribute or Expando in Liferay by Control Panel


Today we will discuss about Custom Field in Liferay.Lets consider a scenario in which you want that User entity must have one extra field like married. How will you add a new attribute to existing Liferay entity User.Custom fields in liferay is the solution for this problem.

Custom fields are designed to allow end users to extends the default data entities like User, Group etc.You can create custom field programmatically  as well as Using Control Panel. Today we create Custom Field  in User entity by Control Panel. 

Expando provides mechanism to create tables, columns, rows and values dynamically.Four tables contain entries for custom fields:-

a)expandotable


b)expandorow



c)expandocolumn


d)expandovalue


So lets start step by step:-

Step 1:-Create Custom Field
Go to Control panel-->Configuration-->Custom Fields. A pop up window is open as:-


Click on edit. A new window is open now click on Add Custom Field button as:-


Then a new window is open as:-


Provide key as married and type as true/false and press save.
Then press Action-->Edit .here you can edit the property of your custom field as:-


Note:-
  • The key of custom field is used to access the attribute programmatically  through the <liferay-ui:custom-attribute> and <liferay-ui:custom-attribute-list />.
  • The key must not contain spaces or spacial character.

Step 2:-Check tables entries in database
Login in your data base and check entries that are created when you create custom fields .Two tables that are changed are:-

a)expandotable


b)expandocolumn



Note:- Only two tables are changed but expandorow and expandovalue are remain same.

Step 3:-Assign custom attribute to User
Go to Control panel-->Users and Organisation-->Add-->User 


provide all details and save.

Then Go to Miscellaneous-->Custom Field-->Select True/false click save.


Step 4:-Check tables entries in database
Login in your data base and check entries that are created when you create create User and add Custom fields to that User .Two tables that are changed are:-

a)expandorow



b)expandovalue


Note:- ClassPk in expandorow and expandovalue is the UserId of  User_ table.


Step 5:-Get the Custom Field in Program
Create a portlet and paste this code inside doView() as:-


Now login as the User created in Step 3 and deploy the portlet and see the output.


Second Approach for getting the value

Login as Admin and change the permission of your custom fields as:-

Create a portlet and paste this code inside doView() as:-


Now login as the User created in Step 3 and deploy the portlet and see the output.

Thats it Hope this will Help.....


Related Post:-


Index Post Processor Hook in Liferay


Today we will discuss about Index Post Processor Hook  in Liferay. In Liferay if you want to providing indexing on some column for searching ,sorting etc. than you can use Index Post Processor Hook.

Ex-Sign in-->Admin -->Control panel-->Users and organization--> all users. Than try to search user by First Name, Last Name,Screen Name you can search easily but than try to search user by Job Title than no result is found.So today we apply indexing on Job Title by using Index Post Processor Hook.


So lets start step by step:-

Step 1:-Create Liferay hook project
File-->New-->Liferay Plugin Project-->Provide name-->Select hook in plugin type-->Finish.
You can see snapshot in step 2 of Portal Properties Hook in Liferay


Step 2:-Create  Class that provide indexing
Now create a package com.demo inside src and then create your class that extends BaseIndexerPostProcessor and override postProcessDocument method.

CustomIndexer.java 


Explanation:-
document.addText(Field.TITLE,jobTitle);

Liferay already apply query on the basis of jobTitle.By using addText we send our jobTitle for indexing, so liferay use this in query.For more detail you may refer UserIndexer.java in source code.As a result for example a user has name "Developer" and other user with Job Title "Developer" than in output both result come.

Step 3:-Provide entry in liferay-hook.xml
Now open liferay-hook.xml click on overview and select indexer class Name as User and IndexerPostProcessor as your class.


This will provide entry in liferay-hook.xml as:-

liferay-hook.xml


Step 4:-Check output
Now deploy the hook and create new user and give some job title. Now try to search this user by Job title.You can easily search this user.

Note:- Only those user can be searched by Job title that are created after deployment of Hook . Previous users are not search by Job title as there is no indexing on job title.

Project Structure


You can Download Source code from Index Post Processor Hook in Liferay


Hope this will Help.....

Custom Action(Events) Hook in Liferay


Today we will discuss about Custom Action Hook  in Liferay. In liferay there are some portal events you can see those events in portal.properties.These events are:-

  • application.startup.events
  • application.shutdown.events
  • login.events.pre
  • login.events.post
  • logout.events.pre
  • logout.events.post
  • servlet.service.events.pre
  • servlet.service.events.post
  • servlet.session.create.events
  • servlet.session.destroy.events

The action of these events are defined in portal.properties so we need to extend portal.properties to create a custom action.


So lets start step by step:-


Step 1:-Create Liferay hook project
File-->New-->Liferay Plugin Project-->Provide name-->Select hook in plugin type-->Finish.
You can see snapshot in step 2 of Portal Properties Hook in Liferay

Step 2:-Create  hook inside project
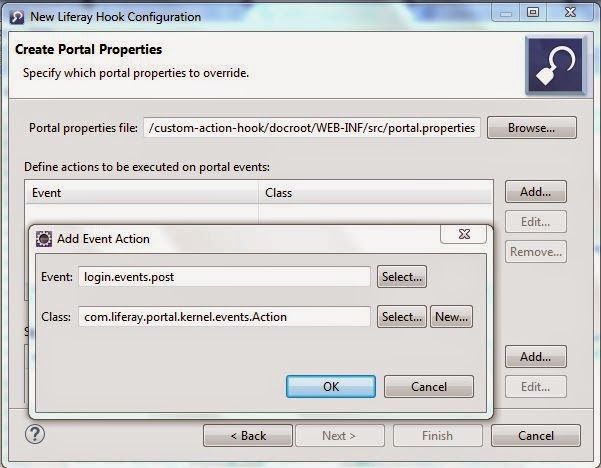
Right click on project-->New-->Liferay hook Configuration-->tick portal.properties-->Next.


then this pop up is open:-


then click on add another pop up is open where you can select the event click on select event button.This time pop up open with events as:-


Select login.events.pre and click ok.Now Click on New button of previous figure to add our class as:-


Provide Classname, java package and select  superclass  as Action and click ok.


Now Ok and finish.This will create portal.properties file automatically also provide entry in liferay-hook.xml.

Step 3:-Check Generated Code
By using eclipse ide portal.properties file automatically created as:-

portal.properties

and liferay-hook.xml as:-

liferay-hook.xml

Step 4:-Provide your custom code
Open MyCustomLoginAction.java from package com.test and paste this code:-

MyCustomLoginAction.java

Step 5:-Check Output
Now deploy your hook and login to liferay as soon as you login the eclipse console shows:-

My Login Pre event


Project Structure


You can Download Source code from Custom Action Hook in Liferay


Hope this will Help.....

Adding Struts Action by Hook in Liferay


Today we will discuss about Adding Struts action in Liferay by using Hook.Before reading this blog you must read my previous blog on  Override Struts Action by Hook in Liferay. Adding Struts action is similar to overriding Struts Action but the difference is :-

For Overriding we extends BaseStrutsPortletAction Class.
For Adding we extends BaseStrutsAction Class.

So lets start step by step:-

Step 1:-Create Liferay hook project
File-->New-->Liferay Plugin Project-->Provide name-->Select hook in plugin type-->Finish.
You can see snapshot in my previous article (Step 1)   Portal Properties Hook in Liferay.


Step 2:-Create Action Class
Create a package com.aditya.demo inside src and than create a class as:-

AddingStrutsAction.java

Explanation:-
In this class we extend BaseStrutsAction class and just provide path of jsp.

Step 3:-Create entry in liferay-hook.xml
Provide the entry of your action class in liferay-hook.xml:-

 liferay-hook.xml

Explanation:-
In this xml we provide the path ie URL and implementing class. For hitting this URL we have to append c as:
http://localhost:8080/c/portal/liferayiseasy 

Step 4:-Create required jsp
Create a jsp hook for the jsp as we return our path from action class as "/portal/message.jsp".

So create a structure in docroot as:-
docroot\custom_jsps\html\portal\message.jsp

Our message.jsp contain just one line:-

message.jsp

and provide entry in liferay-hook.xml as:-
 <custom-jsp-dir>/custom_jsps</custom-jsp-dir>

when you deploy your hook this jsp is available in
"\tomcat-7.0.42\webapps\ROOT\html\portal".

That's it when you hit "http://localhost:8080/c/portal/liferayiseasy" liferay show login page provide credential and you can see 
message .jsp.When you hit the URL and you don't want to provide the credential just make the URL public by property hook.

Step 5:-Make URL to public
Just create Portal Property Hook and override auth.public.paths as:-
auth.public.paths=/portal/liferayiseasy

Now finally your liferay-hook.xml become :-

liferay-hook.xml

For detail of how to create Portal Properties hook you may follow my previous blog Portal Property Hook in Liferay


That's it hit "http://localhost:8080/c/portal/liferayiseasy" and you see output as:-
Welcome here Aditya Bhardwaj

Project Structure


You can Download Source code from Adding Struts Action Hook in Liferay


Hope this will Help....

Override Struts Action by Hook in Liferay


Today we will discuss about Struts Action hook.By using Struts Action hook we can achieve two things:-
1)Overriding existing struts Action
2)Add new Struts Action

Today we will discuss about Overriding existing struts Action. Every time you login a Struts Action is called.Struts use a file called struts-config.xml you can find this file inside WEB-INF .

For overriding Struts Action your custom class must extend BaseStrutsPortletAction which implements  StrutsPortletAction which  contain processAction().
So Lets start step by step:-


Step 1:-Create Liferay hook project
File-->New-->Liferay Plugin Project-->Provide name-->Select hook in plugin type-->Finish.
You can see snapshot in my previous article (Step 1)   Portal Properties Hook in Liferay.

Step 2:-Create Action Path
Open Struts-config.xml (\webapps\ROOT\WEB-INF) and search for login action you will find entries as:-

struts-config.xml

As you can see path "/login/login" goes to "LoginAction" Class. We change this class to our Custom class.So just provide those entries in liferay-hook.xml as:-


liferay-hook.xml

Step 3:-Create Action Class
Inside "docroot/WEB-INF/src" create package com.test and create a class with name MyCustomAction as:

MyCustomAction.java

Explanation:-
Here we create our processAction() and inside this method we call the original processAction() so that flow of liferay not break.In place of SOP you can write your own logic.Similarly for render().

Step 4:-Check Output
Deploy your hook and hit localhost:8080 and then press SignIn button on the top right.Your eclipse console shows:-

My Custom Render Method is Called

Then fill the values in login form and press Sign In


Your eclipse console shows:-

My Custom Process Action Method is Called

Project Structure


You can Download Source code from Override Struts Action Hook in Liferay


Hope this will Help....