Save a Document with Metadata in Document and Media Portlet by using Document Type in Liferay


Today we will discuss how to upload a file or document with metadata in Document and Media Portlet of Liferay. For Example like we upload a document like resume .Name and Description are already there but we need extra fields like experience,candidate name, location, Previous company etc which are associated with the resume.This is done by using Document type .Before reading this blog it is highly recommended to read my previous blogs on Document and Media Portlet in Liferay.

So lets start this step by step:-


Step 1:-Create Metadata Sets
Go to Admin-->Content-->Document and Media-->Manage-->Metadata sets.


After Click Metadata Sets click on Add. Then a new window is open where you provide Name of your metadata sets give it as resume.Now there is GUI tool you should drag and drop to create your metadata fields.


By using field tab you can insert your fields here i am using one text field for Candidate Name and Second Field is decimal for experience.Now for other settings like label  and required you can click on setting tab as:-


All these entries are stored in table ddmstructure in xml format as:-


Step 2:-Create Document Type
Go to Admin-->Content-->Document and Media-->Manage-->Document Types-->Add

Similarly as in Step 1 Give name, description and if you want some more fields add here.Here i use name as Resume Type

Finally Click on select metadata sets and select metadata created in first step ie Resume and Click Save.

This entry is save in dlfileentrytype table in xml format as:-


Note:- We can directly create candidate name and experience in Document Type but a good approach is to create first metadata sets and then select in document type . By using this approach we can select multiple metadata sets in single Document Type.  

Step 3:-Add Folder 
Go to Admin-->Content-->Document and Media-->Add-->Folder Provide name and Description.


And Click Save.Now go to that folder click edit and select document type created in step 2 ie Resume Type


And Click Save.Now this folder can take Resume Type documents.

Step 4:-Add Documents
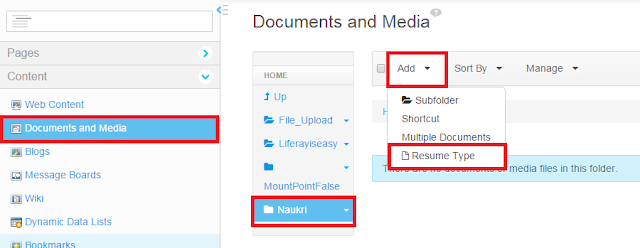
Go to Admin-->Content-->Document and Media-->Naukri(Your Folder)-->Add-->Resume Type


Then a new window open add all the fields and Click Publish.


Default fields are stored in dlfileentry as:-


Metadata Fields are Stored in ddmcontent as:-


Their are two entries one for metadata and second for file.


Hope this will Help.....

Related Post:-

How to Upload Multiple Files in Liferay


Today we will discuss how to upload multiple files in Single browse . We already discuss how to upload a Single file in my previous blog How to upload file in Liferay. Here we create a application where user can select multiple documents and upload in a single Click. Before reading this blog it is highly recommended to read my previous blogs on Document and Media Portlet in Detal ,  Upload Documents Programatically in Liferay  and How to upload files in Liferay.

So lets start this step by step:-


Step 1:-Create Liferay Project and Portlet
Create a Liferay Project in eclipse and then create a MVC portlet in the Project.For theses you may refer Step 1 and Step 2 of my previous blog Here .

Step 2:-Create Your Form
Open view.jsp and paste this code:-


Explanation:-

Here we set multiple="multiple" so that we can upload multiple files simultaneously.

Step 3:-Create portlet.properties
Create a property file in src with name portlet.properties and paste this content:-


Step 4:-Entry for thumbnails
If file is too large liferay not created thumbnail because default maximum size for thumbnail creation of file is 100MB only.Due to this a error comes as "File is too large for preview or thumbnail generation ".So open portal-ext.properties and paste this line and restart the Server.

dl.file.entry.previewable.processor.max.size=-1 

Step 5:-Create method in Java Class
Open your Java class and Paste this Content:-


Explanation:-

  • Here we fetch all the information related to file by UploadPortletRequest object and passing "uploadedFile" which is same as name attribute in our view.jsp for input type file.
  • All the method used in this class are already explained in my previous blog you can check it Here


Step 6:-Check Output
Now deploy your portlet add to page and Check the output as:-


You can Download Source code from How to Upload Multiple Files in Liferay.


Hope this will Help....

Related Post:-

How to Upload Documents and Files in Liferay


Today we will discuss how to upload documents and files in Liferay. For this we will use Document and Media Portlet of Liferay. We already discuss all method in detail. Here we create a application where user can browse the documents and upload the documents and also able to download the uploaded documents. Before reading this blog it is highly recommended to read my previous blogs on Document and Media Portlet in Detal and  Upload Documents Programatically in Liferay .

So lets start this step by step:-

Step 1:-Create Liferay Project and Portlet
Create a Liferay Project in eclipse and then create a MVC portlet in the Project.For theses you may refer Step 1 and Step 2 of my previous blog Here .


Step 2:-Create Your Form
Open view.jsp and paste this code:-


Explanation:-


  • Here in form we use enctype="multipart/form-data". If we provide functionality of upload file than we have to change the enctype default value is application/x-www-form-urlencoded. For detail you may visit here.
  • name="uploadedFile" this attribute is used to fetch mimeType, location of file etc. in java code.


Step 3:-Create portlet.properties
Create a property file in src with name portlet.properties and paste this content:-


Step 4:-Entry for thumbnails
If file is too large liferay not created thumbnail because default maximum size for thumbnail creation of file is 100MB only.Due to this a error comes as "File is too large for preview or thumbnail generation ".So open portal-ext.properties and paste this line and restart the Server.

dl.file.entry.previewable.processor.max.size=-1 


Step 5:-Create method in Java Class
Open your Java class and Paste this Content:-


Explanation:-


  • Here we fetch all the information related to file by UploadPortletRequest object and passing "uploadedFile" which is same as name attribute in our view.jsp for input type file.
  • All the method used in this class are already explained in my previous blog you can check it Here

Note:-

If your form contain both file and fields like text field than you have to get it by passing "UploadPortletRequest " Object. Ex:-
Like we have a form with file and text box name email. Than

ParamUtil.get(actionRequest,"email") always return null

You must use this:-

ParamUtil.get(uploadPortletRequest ,"email");


Step 6:-Create download.jsp
Create a jsp file download.jsp that contain all the links to uploaded files that belong to a particular folder.


Explanation:-

Here we use jstl tags so for using jstl we have to provide entry in liferay-plugin-package.properties as :-

portal-dependency-jars=\
    jstl-api.jar,\
    jstl-impl.jar

Step 7:-Check Output
Now deploy your portlet add to page and Check the output as:-


Project Structure:-


You can Download Source code from How to Upload Documents and Files in Liferay.

Hope this will Help....


Folder and File upload Programmatically in Document and Media Portlet of Liferay


In the previous tutorial we discuss how to add Folder and Documents in liferay by using GUI.Today we will discuss how to add Folder and Documents/Files in Document and Media Portlet by using API methods provided by liferay.

For this we have two set of classes:-
1)DL Services
2)DLApp Services

Any of the classes can used to achieve folder creation, file upload etc.But:-

DLFileEntry services and DLFolderEntry services are specifically for storing file and folder entries in liferay's database and are totally unaware of the new repository concept introduced in 6.1.

Where as DLApp (DLAppService & DLAppLocalService) services take into account these things i.e. to say that they take care of syncing documents between liferay database and other repositories,and not just store entries in Liferay database.

Here i am discussing both .Before reading this blog it is highly recommended to read my previous blog Document and Media portlet in liferay.

So lets start this step by step:-


Step 1:-Create Liferay Project and Portlet
Create a Liferay Project in eclipse and then create a MVC portlet in the Project.For theses you may refer Step 1 and Step 2 of my previous blog Here .

Step 2:-Create Folder in Document and Media
Open you java Class and paste these methods:-


Explanation:-

1)As you can see createfolder() use DLAppServiceUtil and createDLFolder() use DLFolderLocalServiceUtil.
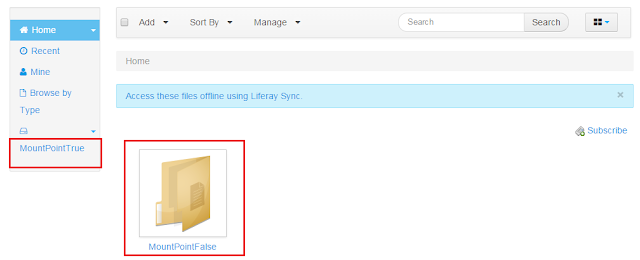
2)In createDLFolder method we have boolean mountPoint.
Run the method two times with both mountPoint values.


See the location of folder where they create.

Step 3:-Add Files to the Folder
Add the two methods and use any of these:-


Explanation:-

1)Here in fileUploadByDL method we use addFileEntry method to add the file in the folder but here file is save in draft mode so we use updateFileEntry method to change the mode from draft to approved.
2)Here if you click on image and message appears like "File is too large for preview or thumbnail generation" just go to portal-ext.properties add this line and restart the server:-

dl.file.entry.previewable.processor.max.size=-1

So thumbnail is generated for any size of file.


Step 4:-Get All Folders
Paste theses two methods.Here you see the difference between DL and DLApp methods:-


Explanation:-


1)Output by getAllDLFolder()

DLFolder Id >> 12304
DLFolder Name >>/12709
DLFolder Id >> 12505
DLFolder Name >>/12714
DLFolder Id >> 12333
DLFolder Name >>/12719
DLFolder Id >> 12401
DLFolder Name >>/12729
DLFolder Id >> 12702
DLFolder Name >>/12734
DLFolder Id >> 12766
DLFolder Name >>Liferayiseasy
DLFolder Id >> 12763
DLFolder Name >>MountPointFalse
DLFolder Id >> 12760
DLFolder Name >>MountPointTrue


2)Output by getAllFolder()

Folder Id >> 12766
Folder Name >>Liferayiseasy
Folder Id >> 12763
Folder Name >>MountPointFalse
Folder Id >> 12760
Folder Name >>MountPointTrue

Here you can see that DLAppServiceUtil give more specific results however DLFolderLocalServiceUtil give all the folders which are even deleted or in recycle bin.

Step 5:-Get a Particular Folder
Paste theses two methods and just provide the Folder name:-


Step 6:-Get download link for files in Folder
Paste this code and pass the folder name to the methods:-


In the next blog How to Upload file in Liferay we create a simple application that can browse the documents and upload in document and media portlet and we can download those documents by clicking on the links.

You can Download Source code from Folder and File upload Programmatically in Document and Media Portlet of Liferay

Hope this will Help....


Document and Media Portlet in Liferay


Today we will discuss Document and Media portlet of Liferay.This portlet is very useful to store documents so that we can use these like we provide user a facility to download the files etc.  Here we will discuss how to create folder and save images or documents in folder and how to access it. Also i show you  tables where the enties are stored. 

So lets start this step by step:-

Step 1:-Create Folder
Click on Admin-->Content-->Document and Media-->Add-->Folder-->Provide name and description and click save


Step 2:-Check Database tables
Open your database and check the following tables:-

a)assetentry
Their table contain many fields like groupId,companyId,usedId,
title,description etc.


Here i show only selected fields,this table contain many more fields.This table contain entry each time you create some assets like upload file ,create web content etc.


b)dlsyncevent
Every time you create a folder or add document this table is updated.


Note :-classpk in assetentry and typePk in dlsyncevent are same.

c)dlfolder
This is the main table which contain the folder entries like userId, companyId, name ,description,folderId ,createdate, modifieddate, path etc.


Step 3:-Add File to Created Folder
Click on Admin-->Content-->Document and Media-->Click liferayiseasy (folder)-->Add -->Select Basic Document


Now Choose the document provide title and description of your document and click Publish.


After publish your file appear in the folder you can see it by clicking on the file.Also you get the download Url as:-


Step 4:-Check Database tables
Open your database and check the following tables:-

a)assetentry
Now see the mime type because we upload image so entry is image/jpeg.Other values are like video/mp4 etc.


b)dlsyncevent


c)dlfileentry
This table contain the main entries related to the document like extension,size,folderId, title etc.


Here this table contain many other coloumns i just show some.

Note:- Check the folderId is 12401 which is same as folderId in dlfolder table.

d)dlfileentrymetadata
This table is used to store the thumbnails of the images.


Here reference key is fileEntryId which is same as of dlFileEntry table fileEntryId.

Note:- No thumbnail is created for text or pdf files.

e)dlfileversion
This table contain the information about file version.


Step 5:-Check Location of files
Open your server directory in your machine .Your image will show :-

Image Path:-
..\liferay-portal-6.2.0\data\document_library\10154\12401\201\1.0

From Database(dlfileentry):-
..\document_library\companyId\folderId\name\version


Step 6:-Check Location of Thumbnail
Open your server directory in your machine .Your image will show
:-

Thumbnail Path:-
..data\document_library\10154\0\document_thumbnail\10181\116\12404\12405.jpg

From Database:-
..\document_library\companyId\fileEntryTypeId\document_thumbnail\repositoryId\116\fileEntryId\fileVersionId\extension
  • Green Color entries are from dlfileentrymetadata table.
  • Black entries are from dlfileentry table.
  • 116 This value is come from a method getDividentPath which is specified in DLImpl class.

In the next tutorial  Folder and File Upload Programatically in Liferay we will add folder and files by using APIs method .