Login in Liferay with Facebook Account


In most of the websites you see that their is a option by which you can login with your facebook credentials. Today we will achieve this Login Functionality with Facebook in our Liferay. This consists of two Major Steps.

1)Create Facebook App
2)Integrate this App with Liferay.

So lets start step by step:-

A)Create Facebook App

Go to facebook Developer site by clicking here . And login with your facebook credentials.Now Click on MyApps and than click Add a New App. A pop up is open click Facebook Canvas as:-


When you click on Facebook canvas a new window is open Click Skip and Create App ID as:-


Now provide your app name , namespaces(must not contain space) and category and Click App ID.


Than a Security Check pop up is open which test you that you are a human and not robot. In my case it will ask to select flowers:-


Select flowers and Click Submit.

Now your app is created .Now Click to settings:-


Now Click on Add Platform a pop up is open select website:-


Now Provide the site url of your website and your email id:-


and Click Save Changes.

Now your App is created. Now make it public by Clicking on Status and Review.Change No to Yes and Click Confirm.


B)Integrate App with Liferay
Now Click on Control Panel-->Portal Setting -->Authentication and Select Facebook as:-


Provide Application ID and Application Secret and tick enabled Now Click Finish.


Check Output

Now Sign Out and Click on Sign In button. You will see a new option facebook .


Click on that you will redirect to facebook login page enter your credentials and you will be able to login in Liferay with facebook.

Note:- You can do Step B with liferay 6.2 but their is a issue in liferay 6.2, you will be redirected to blank page .When you refresh that page than able to login . You can check this issue here

Hope this will Help....


Related Post:-

Custom Field/Attribute or Expando in Liferay Programmatically


We already know how to create custom field using control panel . 
Lets consider a scenario we create 40 custom fields in our local server using control panel . When i deployed my application to production server we need to create all custom fields again in production server . What if as soon as our application start and all custom fields create automatically????


Today we will create same custom field married in User entity which contain boolean value Programmatically . For this we use Event hook in Liferay. So before reading this blog it is highly recommended to read my previous blogs on Custom Fields  and  Event hook in liferay.

So lets start step by step:-

Step 1:-Create Liferay project
File-->New-->Liferay Plugin Project-->Provide name-->Select hook in plugin type-->Finish.


Step 2:-Create  hook inside project
Right click on project-->New-->Liferay hook Configuration-->tick portal.properties-->Next.


then a pop up is open.Add a new event application.startup.events and add a Class which is called on application start.


Step 3:-Check Generated Code
By using eclipse ide portal.properties file automatically created as:-

portal.properties
and liferay-hook.xml as:-

liferay-hook.xml

Step 4:-Provide Code for Custom field Creation
Open CustomFieldsCreations.java from package com.test and paste this code:-

CustomFieldsCreations.java


Explanation:-

  • run method is called when ever application starts.
  • addExpandoTable method check if table already exists than do nothing otherwise create a new table with name  CUSTOM_FIELDS.
  • addExpandoColumn method check if table CUSTOM_FIELDS contain a column with name married if yes do nothing otherwise create new column .
  • addCoumn method of ExpandoColumnLocalServiceUtil take 4 parameters tableId, Column name, type of field here we use boolean and default value which i take as unmarried ie false.

Step 5:-Check Output
Open database and check tables expandotable and expandocolumn.
Or you can go to control panel and check a new custom field is added in User entity.

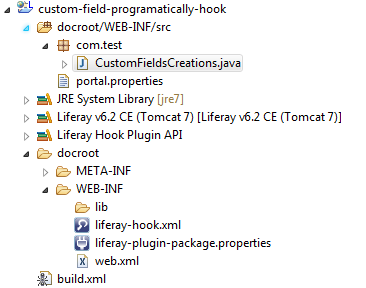
Project Structure


Java Portlet Specification (JSR 168 vs JSR 286)


Initially portal vendors had their own portlet frameworks but the problem is those portlets are specific to portal Server and cannot be deployed to another server.So their is specification or we can say Standards for portlet development. By using those standards you can write a portlet which can be run on all compliant portlet Containers.


Their  are basically two JSR standard for portals:-

1)Java portlet specification 1.0 ie JSR-168

JSR-168 released in 2003 and give standards for :-

  • Portlet API.
  • Portlet Taglib
  • Portlet Life Cycle
  • Window States
  • View Prefrences


This specification introduced two phases:
  • Render Phase
  • Action Phase


2)Java portlet specification 2.0 ie JSR-286

This specification introduced two extra phases so now we have 4 phases:-

  • Render Phase
  • Action Phase
  • Event Phase for IPC
  • Resource Serving phase for Ajax calls.

Features in JSR-286:-

1)Portlet filter is introduced .
2)Annotation support in Generic portlet.
3)Generate non mark up content like images, pdf using Resource serving phase.
4)Interportlet Communication is easily handled using Events.


Hope this will Help....


Related Post:-

Database Migration From Liferay 6.1 to Liferay 6.2


Today we will discuss how to migrate database (users, roles,pages, webcontent etc) from Liferay 6.1 to Liferay 6.2. I assume that you already installed Liferay 6.1 and created pages , roles and user. The name of the database we are using for liferay 6.1 is named as liferay6.1db.

So lets start this step by step:-


Step 1:-Take backup of your database
As a precaution take backup of your database ie liferay6.1db so that if anything goes wrong your have your original database.

Step 2:-Install liferay 6.2 with hypersonic
Install liferay 6.2 and use hypersonic databse which is provided by liferay.

Step 3:-Replace document library folder
Now copy content from document_library folder of liferay 6.1 (..\liferay-portal-6.1.2-ce-ga3\data\document_library) and paste in liferay 6.2(..\liferay-portal-6.2.0-ce-ga1\data\document_library).

Step 4:-Change portal-ext.properties
Now open portal-ext.properties file and point database entry to liferay 6.1 database ie liferay6.1db.

You have to change algorithm also which is used in liferay 6.2


Step 5:-Restart the Liferay 6.2 Server
Now restart your server .You can see migration activity on the console of your tomcat . Thats it your database migrated successfully from liferay 6.1 to 6.2.

By using this approach you can migrate:-

  • User
  • Roles
  • Pages
  • Structures and Templates
  • Web Content.


Note:-  

If this error comes:-

Then open data base table portletprefrences and change NULL to some text like "Change to Not Null by me"

And Restart Server.


Hope this will Help....


Related Post:-

Quartz Scheduler in Liferay


Today we will discuss about Schedular in Liferay. Sometime we have a situation in which we have to perform a task repeatedly after a certain period of time.Ex- Send a mail every week.

Liferay provide a simple way to achieve this.We create schedular class and provide entry of timing in liferay-portlet.xml. Time for schedular can be define by 3 ways:-

1)Using Liferay Feature

Ex-   <simple>
<simple-trigger-value>1</simple-trigger-value>
<time-unit>minute</time-unit>
</simple>  

Here in time unit we mention minute and in simple trigger value we mention 1 .This means this job run in each minute.

2)Using Property file

Ex- <cron>
<property-key>everyThirtySecond </property-key>
      </cron> 

We define key and cron expression in portlet.properties file like everyThirtySecond = 0/30 * * * * ?

3)Using Cron Expression Directly

Ex- <cron>
        <cron-trigger-value>0/15 * * * * ?</cron-trigger-value> 
       </cron>

This job runs in every 15 seconds.

Note:- For Cron Trigger Expression you may refer here.

So lets start this step by step:-


Step 1:-Create Liferay Project and Portlet
Inside eclipse IDE Click on File->New->Liferay plugin project and give the project name as schedular and click finish. After that Right Click on your project and click on New than click on Liferay Portlet. Provide class name as Demo and select MVCPortlet and click finish.

Note:-You can check the snapshots in my  blog on Portlet Configuration Page in Liferay.


Step 2:-Create Schedulars
Inside com.test package create 3 classes that implements MessageListener inteface and provide the definition of receive method.

FirstSchedular.java


SecondSchedular.java


ThirdSchedular.java


Step 3:-Provide timing in liferay-portlet.xml
Open liferay-portlet.xml and paste this:-


Explanation:-
Here we provide the entries of all 3 Schedulars.


Step 4:-Create portlet.properties
Inside docroot/WEB-INF/src create portlet.properties and paste this:-

everyThirtySecond = 0/30 * * * * ?

because second schedular take value from property file.


Step 5:-Check output
Deploy the portlet and add to page:-


Now check eclipse console


Project Structure


Hope this will Help....

You can Download Source code from  Schedular in Liferay.


Related Post:-