Spring MVC Portlet in liferay

Spring MVC Portlet in Liferay 


Today we will discuss how to create Spring Portlet in Liferay.For doing this first we create a simple Portlet and then convert it into Spring Portlet.By using Spring Portlet we can handle multiple action request ,multiple resource request in seperate methods.We can have multiple action methods in single class.
Lets Start this step by step:-


Step 1:-Create liferay Plugin Project
Open eclipse click on :-
file->New->Liferay Plugin Project.
Give project name as FirstSpringMVC and finish.


Step 2:-Create MVC Portlet in project
Right Click on project->New->Liferay Portlet


This will open a new window provide portlet class name, package name and select superclass and Click Finish.


This will create a basic portlet .Now we have to convert it into Spring portlet.

Step 3:-Provide Spring jars to classpath
For using Spring we have to provide Spring dependency jars to class path.Following are the list of jars:-

  • spring-web-servlet.jar
  • spring-web-portlet.jar
  • spring-web.jar
  • spring-transaction.jar
  • spring-jdbc.jar
  • spring-expression.jar
  • spring-core.jar
  • spring-context.jar
  • spring-beans.jar
  • spring-asm.jar
  • spring-aop.jar
  • spring-aspects.jar
  • spring-context-support.jar
  • spring-jms.jar
  • spring-orm.jar
  • spring-oxm.jar
  • spring-web-struts.jar
  • commons-beanutils.jar
  • commons-collections.jar
  • commons-fileupload.jar
  • commons-io.jar
  • commons-lang.jar
  • jstl-api.jar
  • jstl-impl.jar 
So open liferay-plugin-package.properties from web-inf and add the following jars.

liferay-plugin-package.properties


Step 4:-Provide ViewRendererServlet in web.xml
ViewRendererServlet is a bridge servlet, mainly for the Portlet MVC support.For usage with Portlets, this Servlet is necessary to force the portlet container to convert the PortletRequest to a ServletRequest, which it has to do when including a resource via the PortletRequestDispatcher. This allows for reuse of the entire Servlet-based View support even in a Portlet environment.

web.xml

Note=>These are hard code entries and same for every project

Step 5:-Provide entry of Front Controller
Front Controller handle all request/response flow it is mention in portlet.xml as:-

<portlet-class> 
org.springframework.web.portlet.DispatcherPortlet
</portlet-class>

Step 6:-Create Spring Application Context File
Front Controller after receiving request take help from some helper classes these classes are mention in a seperate file whose name is :-
<portlet-name>-portlet.xml 
Ex- first-controller-portlet.xml.

Any Spring Project contain atleast one application context file where all beans and helper classes are defined.So create a folder inside WEB-INF named spring-portlet-config and inside this folder create first-controller-portlet.xml.

first-controller-portlet.xml


Explanation:-


1)DefaultAnnotationHandlerMapping
The helper that help Front Controller that which controller is handled which request ie help to find the controller because there are many Controller but only one Front Controller.

2)<bean class="com.first.FirstController" />
Here we provide the full path of our controller class if we have more than one controller than we can use tag 
<context:component-scan base-package="com.first" />
and provide the package path where all controller resides.

3)<bean id="jspViewResolver" class = " ">
When controller return the name of jsp front controller take help from view Resolver to find the exact path of jsp by using prefix and suffix properties.

4)<context:annotation-config /> 
Because we are using annotation to register bean this tag is mandatory if we are using annotation.

Step 7:-Provide entry of ApplicationContext file
We have to provide the entry of this context file in portlet.xml so that our Front Controller find this file to delegate the request to this file.

Now our portlet.xml look like :-

portlet.xml
Step 8:-Create Controller Class
Open class FirstController and paste this :-

FirstController.java
Explanation:-


1)@Controller(value = "FirstController")
This annotation is class level annotation and register this class as a controller the value is name of class.

2)@RequestMapping("VIEW")
This annotation tell that this controller handle view mode for edit mode you have to create a new controller.

3)@RenderMapping
This annotation is method level annotation and tell that this method is treated as render method.

4)return "hello"
Name of the jsp file which is to be render.

Step 9:-Create View
Here our view is jsp so create hello.jsp (/docroot/html/firstcontroller/hello.jsp)

hello.jsp

Step 8:-Deploy Your Project
Right Click on build.xml->Run As->Ant Build.

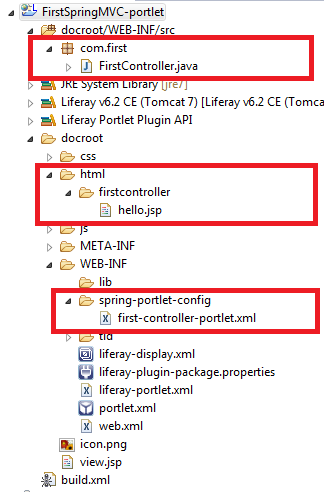
Thats it final project Structure is:-


You can download source code from Spring MVC Portlet in Liferay


Hope this will help....

 Related Post:-

Form Handling in Spring MVC Portlet

Ajax in Spring Portlet

Custom Sql in Liferay

Many To Many Relationship mapping in Liferay Services

Liferay Service Builder in Detail

How to install Maven

Creating Portlet/Services using Maven


Creating Portlet and Services using Maven in Liferay

Liferay Portlet And Services using  Maven 


Defining Maven in a single line is not possible .Maven do many things for us like resolving dependencies, create project structure, build  a project, creating war/jar etc. By using Maven you can also create portlet, theme, services without any need of sdk. Before starting this you have to install Maven and Ant in your machine.So it is highly recommended to read my previous blog  How to install Maven and How to install Ant.

Lets Start this step by step:-


Step 1:-Set up liferay-portal-maven
First download liferay-portal-maven from here according to your server version , in my case liferay-portal-maven-6.2.0-ce-rc5 and i am using liferay-portal-6.2.0-ce-rc5 server.

After downloading extract it to a folder and open it . Create a file build.username.properties inside this here username is your Computer name like in my case  build.Aditya.properties . Then paste this inside build.Aditya.properties:-

build.Aditya.properties

Then Open command prompt and go to that directory(H:\Liferay6.2 practice\liferay-portal-maven-6.2.0-ce-rc5) and run ant install. This will take sometime because it install many necessary file be sure you are connected to internet.All downloaded files goes to C:\Users\Aditya\.m2.

Note:- Step 1 is one time process next time you can directly create project.

Step 2:-Creating Project
Create a folder in which you want to create your project .Open command prompt go to your folder and run 
mvn archetype:generate

This will give you a huge list of archetype, filter it with liferay this will give you are liferay related archetype select liferay-servicebuilder-archetype ie number 10 and press enter.


After this it will ask for archetype version:-


select  version you can match the version from C:\Users\Aditya\.m2\repository\com\liferay\portal\portal-impl


in my case it is 6.2.0-RC5  ie select17 enter 17 press enter. After this you have to enter:-

  • groupId:- package name in which all your classes is generate.
  • artifactId:-Name of project by which war is created.
  • version:-leave blank
  • package:-leave blank

 press y and enter.


Now go to that folder your project is now created which contain 3 things:-
1)student-management-portlet
2)student-management-portlet-service
3)pom.xml

Step 3:-Provide entries of Deployment in pom.xml
Open pom.xml and provide entries of server after version tag now your pom.xml become:-

pom.xml

Line 11 to 19 <properties> tag provide the information of server and deploy directories.
After this open command prompt and  go to that folder where is pom.xml and run command:-
mvn clean install

Step 4:-Create service in Project
Now open this project in eclipse as :-
import->Maven->Existing Maven project 
And give the path till parent folder and click finish this will open 3 project in eclipse as:-

1)student-management:- Parent folder we run our project from here
2)student-management-portlet:-This is our main project all service impl classes are here .
3)student-management-portlet-service:- This contain only service classes but not impl classes.

Open service.xml from student-management-portlet inside web-inf and paste your services .For detail explaination of service.xml you can refer my blog Service builder in Detail

service.xml

Open command prompt go to folder where pom.xml of parent is and run command:-
mvn clean liferay:build-service
This command will generate all the service .Refresh both projects.


Step 5:-Create Portlet in Project
Now open student-management-portlet create a package inside src/main/java and inside that package create your controller class and paste this content:-

StudentController.java

Then create a folder html/student inside webapps and create your view.jsp .

view.jsp

then provide corresponding entries in of portlet class and init-param in  portlet.xml .

portlet.xml


After this provide entry in liferay-display.xml.

liferay-display.xml

Step 6:-Deploy your project
Open command prompt go to folder where your parent pom.xml and run command:-
mvn clean compile package liferay:deploy

This will deploy your project on server you can see your war file in target folder(..\student-management-portlet\target).

Thats it open your browser and hit localhost:8080 and just put your portlet on page and see tomcat console your service is call sucessfully.

You can download source code from Creatin portlet/Services with maven


Hope this will help....

 Related Post:-

Liferay Service Builder in Detail

How to install Maven

How to install Ant


How To Install Ant

How to install Ant?


Ant is a Apache project.It is open source software used to compile , assemble and run java application .Before installing Ant it is compulsory to install Java as mention in my previous article How to install Maven step 1. 


Lets Start this step by step:-


Step 1:-Down load Apache Ant
First download Apache ant from Here and extract it in c drive. After extracting set the two environment variable as:-

  • ANT_Home  = C:\apache-ant-1.9.4
  • PATH = C:\apache-ant-1.9.4\bin
PATH is seperated by ;


Step 2:-Test Apache Ant

For Checking that Ant install successfully you can open command prompt(win+r then type cmd) and type ant -version this will give you detail as:-


Hope this will help....

Related Post:-

Liferay Service Builder in Detail

How to install Maven

Creating Portlet/Services using Maven


How to install Maven

How to install Maven ?


Defining Maven in a single line is not possible .Maven do many things for us like resolving dependencies, create project structure, build  a project, creating war/jar etc. By using Maven you can also create portlet, theme, services without any need of sdk. So lets install maven.

Lets Start this step by step:-

Step 1:-Install Java(jdk)
For installing Maven first we need to download jdk from  Here and install.Then set the environment variable(User Variable).For setting environment variable in window 7 .
Click start-->right click on computer-->properties-->Advanced system setting-->Advanced-->Environment variable-->New

The two important variables are:-

1)PATH
  This environment variable is provide the path of  javac otherwise you have to copy paste your java file into bin and then compile your file from inside the bin folder of jdk. Ex-

  PATH = C:\Program Files\Java\jdk1.8.0_31\bin

2)JAVA_HOME
  This variable is need to run many other software like tomcat and maven.This takes the path till jdk. Ex-

  JAVA_HOME = C:\Program Files\Java\jdk1.8.0_31


For Checking that java install successfully you can open command prompt(win+r then type cmd) and type java -version this will give you detail as:-


Step 2:-Install Maven

  • For installing Maven first we need to download maven from here and extract in C drive .
  • Then set  M2_HOME = C:\apache-maven-3.2.3
  • Then set PATH = C:\apache-maven-3.2.3\bin
Now your path become:-

PATH = C:\Program Files\Java\jdk1.8.0_31\bin;C:\apache-maven-3.2.3\bin

Seperated by ;

Step 3:-Check Maven
For Checking that Maven install successfully you can open command prompt(win+r then type cmd) and type mvn -version this will give you detail as:-


Hope this will help....

Next Post:- Creating Portlet/Services using Maven

Related Post:-

Liferay Service Builder in Detail

How to install Ant

Creating Portlet/Services using Maven


Custom Sql With Two Table

Custom sql/sql query with two table 


As discussed in my previous article Custom Sql in Liferay , custom sql is used to write native sql query in liferay. Today we will discuss how to write custom query that belong to two or more table like join query. Before Reading this blog it is highly recommended to read my previous blog on  Service Builder in Detail and custom sql in liferay .

Lets Start this step by step:-

Step 1:-Create service.xml
You can create service as mention in my previous article Service Builder in Detail .

service.xml

And Build Service


Step 2:- Fill data in tables
After inserting data tables in data base look like this:-


For our example we like to fetch all the student details that belong to India ie our query is:-


Step 3:- Create our method
Open either any one from:-
a)StudentLocalServiceImpl  b)StudentAddressLocalServiceImpl 
Because we have to fetch the data from both the tables so pick any one .

StudentLocalServiceImpl 
Explanation:- 

1)List<Object[]> getAllDetailByCountry(String name)
Here we create a method that take String argument and whose return type is List<Object[]> because output result is neither of Employee type and not of Address type it is a combination of both.

2)Session session = studentPersistence.openSession()
Here we create a Session object with studentPersistence

3)SQLQuery query = session.createSQLQuery(" ")
Here we create our query this is not the standard way normally we take query from xml file like i described in Custom sql in Liferay but this approach is sometimes very handy when we have to save time.

4)QueryPos pos = QueryPos.getInstance(query)
Here we pass the query and fill the value of ? with pos like
Ex- pos.add(countryName);
and than finally return the list.

Again Build Service

So that this can be available in Util class.

Step 4:- Call method from util Class
After building services this method is available in StudentLocalServiceUtil use it like:-


You can download source code from Custom Sql with two table


Hope this will help....

 Related Post:-

Liferay Service Builder in Detail

Custom Sql in Liferay

Many To Many Relationship mapping in Liferay Services


Many To Many Relationship in Liferay Services

Today we will discuss Many To Many relationship in Liferay


As discuss earlier Liferay Service Builder create tables with service.xml. But is there any way to provide Many To Many relationship between entities. Yes there is today we will discuss  Many To Many relationship in liferay. Before Reading this blog it is highly recommended to read my previous blog on  Service Builder in Detail.

Lets Start this step by step:-

Step 1:-Create service.xml
You can create service as mention in my previous article Service Builder in Detail .

service.xml

Just focus on line no 11 and 17:-


Explanation:-
Here we create a third entity(table) Employee_department Which contain the primary key of both tables.


Step 2:-Check point
Now build the service.xml and open tables.sql inside sql folder.  

tables.sql

As you can see 3 tables are created two for entities and one for mapping.

Step 3:-Calling Services
Just create a doView() method and add data to the tables here we consider a scenario where one employee belong to two department.


Thats it just see the tables in database:-


You can Download source code from Many To Many mapping in Liferay


Hope this will help....

Related Post:-

Liferay Service Builder in Detail

Finder Method for Service Builder in Liferay

Custom Sql in Liferay

Custom Sql with two table in Liferay

Liferay Service Builder in Detail

How to install Maven

Creating Portlet/Services using Maven


Custom Sql in Liferay

Today we will discuss Custom Sql/Sql query in Liferay


Liferay Service Builder create basic CRUD method but there are some scenarios when we have to write SQL query. For writing native SQL query we use the concept of Custom Query in Liferay. Before Reading this blog it is highly recommended to read my previous blog on  Service Builder in Detail.


Lets Start this step by step:-

Step 1:-Create service.xml
You can create service as mention in my previous article Service Builder in Detail .

service.xml


Step 2:-Create xml files for sql Query

Now create a folder custom-sql inside src and create default.xml in it.

default.xml(/WEB-INF/src/custom-sql/default.xml)

here we can write our sql query but for good maintanability we create seperate file student-custom-sql.xml and include in default.xml.

student-custom-sql.xml

  • Here we use sql id this is unique for each query.This id is used to fetch the query in method.
  • No need to write semicolon(;).
  • You can create one xml file for one entity and then include in default.xml.

Step 3:-Create xxxFinderImpl Class
Now create xxxFinderImpl class inside persistence in our case create StudentFinderImpl that extends BasePersistenceImpl and implements StudentFinder.

StudentFinderImpl.java

Initally it shows error because there is no StudentFinder interface.

Run Service builder

After this error is gone and StudentFinder interface is created which is blank.


StudentFinder.java
One more class StudentFinderUtil is also created .

StudentFinderUtil.java

Step 4:-Create method in xxxFinderImpl Class
Create method in this class and provide implementation.This is the main task where we fire query and get the result.

StudentFinderImpl.java

Explanation:-

1)CustomSQLUtil.get("studentBetweenQuery");
Here we fetch the sql query from xml file with the help of sql id. For different queries different id and method in this class.

2)queryObject.addEntity("Student", StudentImpl.class);
Here we add our entity to queryObject. If sql query belong to multiple tables than we have to add all the entities to query object.

3)return (List<Student>) queryObject.list();
Here we return List<Student> because our query return all records belong to Student table but if our query contain two or more table like in case of join then we return List<Object[]>.

Step 5:-Expose method to LocalServiceUtil Class
We can't directly call method from StudentFinderImpl or StudentFinderUtil . All method are call from xxxLocalServiceUtil
Class so first we create method in xxxLocalServiceImpl 

StudentLocalServiceImpl.java

Here this show error because StudentFinderUtil has not contain getStudentBetweenStudentId(start, end).

Run Service builder

Now error is gone coz this will create method in StudentFinder interface and StudentFinderUtil  Class also.Now StudentFinder and StudentFinderUtil become:-

StudentFinder.java

StudentFinderUtil.java

Now Both Contain  getStudentBetweenStudentId(int start, int end).

Note:-
Normally we first create method in interface then provide implementation in Impl class but in Liferay we provide implementation in xxxLocalServiceImpl first and Run service builder which create method in Inteface.

Step 6:-Call method from LocalServiceUtil Class
Now from your doView() or from jsp call your method as:-


You can download source code from Custom Sql in Liferay


Hope this will help....

Related Post:-

Liferay Service Builder in Detail

Custom Sql with two table in Liferay

Finder Method for Service Builder in Liferay

Many To Many Relationship mapping in Liferay Services

Liferay Service Builder in Detail

How to install Maven

Creating Portlet/Services using Maven


Finder method for Service Builder in Liferay

Today we will Discuss Finder method for Service Builder in Liferay


In my Previous article Service Builder in Detail we see that liferay created basic CRUD method automatically but what if we want to add our custom method in Liferay services . There are many ways but creating Finder method is the simplest one.


Lets Start this step by step:-

Step 1:-Create service.xml
You can create service as mention in my previous article Service Builder in Detail .Today we add finder method in my Services:-

Service.xml


Just Focus on these lines:-

Explanation:-

1) <finder name="Mobile" return-type="Collection">
a) name="Mobile"
This is the name by which method is Created. Our method is Created by name 
findByMobile(). findBy is automatically prepended by liferay.

Note=> The name must be Capital otherwise method is created as findBymobile() 
which is not follow java camel case convention.

b) return-type="Collection"
return type of our method Collection represent List<T> in this case List<Student>.


2)<finder-column name="mobileno"></finder-column>
Column-name represent on which column you want to apply conditions.

After doing this just build your service and refresh your project.


Step 2:-Check Point

At this point liferay create our method in two places:-

1)StudentPersistence (Interface)
(under web-inf/services/com/aditya/services/persistence)

This interface contain many overloaded method of same name like:-
Their are other method also like removeByMobile, countByMobile etc.

2)StudentPersistenceImpl (Class)
(under web-inf/src/com/aditya/services/persistence)
This contain the implementation of StudentPersistence interface.

Step 3:-Expose method to Util Classes

Till now our method is not available to LocalServiceUtil Class.We have to expose it.Open StudentLocalServiceImpl Class. This class is just blank provide implementation of your method here so that it can be available by Util Class.


As you see in implementation we just call the method from interface thats it.
Now again build services and that it .Your method is now available to StudentLocalServiceUtil Class.

You can download source code from Finder method for service builder in lifeary


Hope this will help....

Related Post:-

Liferay Service Builder in Detail

Custom Sql in Liferay

Custom Sql with two table in Liferay

Many To Many Relationship mapping in Liferay Services

Liferay Service Builder in Detail

How to install Maven

Creating Portlet/Services using Maven